BulkMailer Professional Online Help

Welcome to the BulkMailer Help

Current Version: BulkMailer 2020  (Download)

BulkMailer is used for easy sending of bulk e-mails from a database.

For this you can select between using a pre-defined (internal) database or any existing database. Access to practically every data source is possible via Microsoft Data Access Components (MDAC) / OLE-DB / ODBC.

The contents of data fields can be integrated into the mail text; this method allows the generation of personalized salutations, among other things.

You can use BulkMailer for newsletters, customer information, etc.

Warning: The sending of emails without advance approval from the recipients (SPAM) is prohibited! BulkMailer was not developed for this purpose. The use of this program to send spam mailings is in violation of the license agreement.

Before you use the program...

  1. Configure the program.
  2. Order a DEMO PIN free of charge and obligation. The PIN will be automatically sent to you by email.
  3. Test the configuration by sending test mails.

Mailings only 4 Steps Away

  1. Import addresses into the internal database or open an existing database
  2. Compose an email
  3. Select "Compile Mailing". This compiles the emails into the Outbox
  4. Select "Send Mailing"
 

Best wishes for fun and success from

Detlef Kroll - Kroll Software-Development


Program Options

Before you can send emails with BulkMailer, you need to configure some settings under Extras->Options:

Options

Enter here your SMTP Server. SMTP stands for Simple Mail Transfer Protocol. If you are unsure which one you have, check your other mail client, e.g. in Outlook Express underAccounts->Email.

Ask your system administrator or provider which mail server you can use. Often these Servers have names like "mail.Your-Provider.com" or "smtp.Your-Provider.com".

SMTP Servers are normally operated at Port 25. It is only in rare cases that you would specify a different port here.

The default SMTP-Port is port 25.

Select 60 (seconds) by default. Select a smaller value to disconnect faster in case of connection errors.

Enter your valid sender email address, e.g. "your.name@your-provider.com". Use the email address with which you wish to send bulk mails. For this email address you will need a valid PIN, which is valid to this address. You can order a Demo-PIN for free.

Enter your complete name or company name.

Reply To: This field will be evaluated by the recipient's mail client, when he clicks on 'Reply'. The replies will go to this different address.

Return-Path: The Return-Path will only be evaluated by machines. By entering a different Return-Path, bounce mails can be directed to a different mail account.

Error-To: This Email-Header is only mentioned for completeness and is not supported by many mail servers.

Organization: Your company name. Not all mail clients will show this header value.

Today most SMTP servers are protected by SMTP Authentication. You can get the username and password for your mailbox from your system administrator or your provider. (The SMTP login ist mostly identical with your POP3 login.)

Some providers require the login to the POP3 mailbox, before you can send mails over SMTP. But this is used rarely today. Enter your POP3 access data here in such cases.

Some providers permit only a limited number of mails per session. In such cases, BulkMailer can automatically disconnect from the SMTP Server after a certain number of mails, then wait for an amount of time which can be pre-set in order to logon again and continue with the sending of the mailing.

Select a suitable codepage for your mailings. This is about the correct display of special and non US character sets.

When only writing in english or western european languages, you should select Westeuropäisch/USA for best reading. When writing in other languages as chinese, japanese, etc, we suggest the UTF-8 format.

BulkMailer PIN

Enter your valid sender email address and your PIN under Extras->Options. You can get a free Demo-PIN in seconds by clicking on "Get Demo-PIN" (see below).

PIN Validation

The program checks the validity of a personal identification number (PIN) before sending emails. This PIN is tied to one or more sender email addresses.

This mechanism is to avoid program misuse. It is something from which all those users who wish to utilize the program for serious bulk mails will profit.

Kroll-Software guarantees that no additional data is transmitted during the PIN check. Your email address will not be communicated to any third parties.

PIN Validation

Requesting your Demo PIN for Evaluation

Enter your valid sender email address under Extras->Options.

Then click on the button "Get Demo-PIN by Email". The PIN will be sent to the specified sender email address in a few seconds.

Then enter this PIN in the PIN field under Extras->Options and click on the button "Test PIN". Wait for 20 Seconds. The message "DEMO PIN" should be shown.

If you get an error "host not found" please check if any anti-virus software or personal firewall blocks the request.

The Demo PIN is valid for 30 days. The sending of attachments is not possible during the evaluation phase.

If you have problems or questions concerning the ordering of the PIN, please do not hesitate to contact Kroll-Software either by email or by phone.

Licensing the Full Version

If you wish to use the program after the 30 days trial period, you will need to obtain a license. Companies from the EU can order licenses per invoice.

You can place your order here.

Sending Test Mails


Once you have completely configured the program and have entered a Demo-PIN, you can test the sending of mails by sending a few test mails addressed to yourself.

  1. Select the menu item "Mailing->Create Test Mails".
  2. Confirm the question "Create 10 test mails to … ?" with Yes
  3. The program switches over to the Outbox and shows 10 test mails
  4. Make sure that your computer is online
  5. Select the menu item "Mailing -> Send Mailing"
  6. A dialog appears concerning the licensing agreements
  7. Read the licensing text
  8. If you agree to the stipulations, mark the corresponding field and click on "Send Emails."
  9. Your PIN will be checked and the program switches over to Mail sending dialog
  10. Click on "Start"!

The test mails will now be sent to your address.

If the error message like "we do not relay" or "authentication failed" appears, it is possible that the access to your SMTP Server is not correctly configured or that you are not authorized to send mails through this Server. Also see Problems: Authenticating with SMTP Servers

Internal Database


Use the internal database to collect your addresses directly in BulkMailer. You also have the alternative option of accessing an external database directly in order to compile a mailing from it.

The internal address database allows the generation of a personal salutation. Types of salutations belong thereby to particular groups. All of this can be configured freely.

Administering Addresses

BulkMailer automatically sets up an empty address database (addresses.bm3) the first time it starts up.

Select the menu Address->New address (F6) or click on the corresponding icon. The dialog for searching for duplicate records appears. Enter here the email address. If the address already exists in the database, the place where it is to be found will be listed. You can then display this data set or enter a new email address.

If the data set does not yet exist in the database, the empty entry mask will appear. The email field is already filled out. As a minimum, you should fill out the following fields in order to be able to generate automatic salutations:

  • First and last name or company name
  • Gender
  • Group

The automatic salutation will be shown in the status line. This is dependent on the group selected. Click on OK to store the record.

Double click on an address in the addresses grid. The entry form will open to allow you to alter the data.

Select one or more addresses in the addresses grid and press the 'Del.' button or click on the corresponding icon.

Grid Display of the Addresses

Click on the 'addresses' card in the main window.

Click on one column heading in order to sort according to this column.

Click on the 'Grouping' icon. Then drag a column heading over to the area 'Drag column here for grouping'. Groups will now appear which can be expanded and collapsed in turn. Predefined groupings can be selected with the arrow next to the Grouping icon.

To return to the ungrouped view, click once again on the 'Grouping' icon.

Click on the binocular icon (Ctrl-F) in order to search within the table displayed. Click on the smaller binocular (F3) to search further.

The search functions work by comparing character strings and are therefore slow. You should use the selection functions to search for addresses in larger-sized data groups.

The Query functions are based on SQL queries and are therefore very fast. There are 2 different dialogs available for use:

  • Search - F6 (frequently used fields, only for internal database)
  • Extended Search - F7 (any kind of selection, even in external databases)

The current selection is also valid for mail compilition. That means that the mailing will be compiled from the current selection when you click on 'Compile Mailing' and select 'All Visible Records'.

You can edit addresses directly in the table grid. Check the corresponding icon to do this. You should however take care when doing this; modifications cannot be reversed once they have been made.

Administering several address databases

Select the menu items under 'File' in order to

  • set up a new address database
  • open an existing address database

The current address database and the full physical path will be displayed in the address card title. Each address database has its own self-defined groups and salutations.

External Database


The following reasons support the utilization of an external database:

  1. Your company already maintains an address database, customer database or something similar. In such cases it would be too laborious to have to import the current version of this database each time it was needed.
  2. The structure of the internal database is insufficient for your purposes; you require additional fields, e.g. for salutations in more than one language, text templates, etc.
  • Your existing DBMS (Database Management System) is equipped with an ODBC driver or (better) an OLE DB driver. Drivers for dBase, FoxPro, Access, MS-SQL Server, ... are already available through MS Jet 4.0.
  • Your database contains at least a column with email addresses.

Recommended DBMS: MS Access, MS SQL Server

Here’s how it works

  1. Select main menu "File->Open External Datasource..."
  2. Connect to your database. Different further dialogs appear, depending on the selected database.
  3. After successful connection you can select a table or query (for databases only)
  4. BulkMailer now needs to know which column contains the e-mail addresses. Enter this information as a minimum in the following dialog.

Once everything has happened correctly, the database will be shown in tabular form under 'Addresses'.

To ensure that this procedure need not be repeated, you can now save this database connection by selecting "File->Open External Datasource->Save Dataconnection..." in the Main Menu. Next time you need it, you can open this file via "File->Open External Datasource->Open Stored Dataconnection".

Starting here, everything proceeds the same as with internal databases, except for the following limitations:

  • Records cannot be edited in BulkMailer; use your DBMS for this purpose.
  • Automatic salutation, administration of groups, etc. need to be handled in the external database. It would be advantageous for example to have a salutation field which contained the entire salutation ("Dear Mr. Smith"). This database field could then be integrated into your mail as the salutation.
Access to ACT! CRM

Please see Manual as PDF (in german language)

New Mail


All mailing texts which have been created appear on the left-hand border of the window under 'Mailings'. Select 'Email->New Email' in the Main Menu in order to create a new Mail.

Additional options for the administration of the mails appear when you click with the right mouse button on an entry in the "Mailing" list:

Mailing Options with right mouseclick
  • Rename Mailing
  • Create new Mailing (Text or HTML)
  • Delete Mailing

Composing the Mail Text

A particular mail must be selected before the text can be edited.

Switch over to the "Message" card and enter your text there. Do not forget to specify a Subject.

In addition:

HTML Mails

Creating pleasing Html Mails

BulkMailer has a built-in Html editor with a functionality that is typical for email clients.

If this is not enough for you and you want to create more complex Html,

  • use a Html editor of your coice
  • Save the Html file to your hard disk
  • Load this file into BulkMailer with menu "Email->Load Webpage from File"
If you don't have the skills to create Html, this might be a good task for your web-designer

BulkMailer offers full support of HTML Mails

Whenever an email is to contain text formatting or images, the type of mail involved is what is referred to as an HTML Mail. Almost all modern email clients are now able to display HTML mails.

For older email clients, BulkMailer automatically adds an ASCII part to the email so that the text it contains can be displayed.

  • Compose HTML mails with the integrated Editor.
  • Graphics can either be sent together with the email or referenced by a link to a file on a Webserver.

Composing and Sending HTML Mails

  1. SelectEmail->New Email (HTML) in the Main Menu
  2. Or convert an existing mail using the menu item Email->Format HTML
  3. An additional toolbar will appear in the message editor with functions for text and page formatting as well as for the inclusion of graphics and links.
Insertion of Images
  1. Click in the toolbar on the icon Insert image
  2. The following appears in the dialog Image
    • Click on Image Source->Browse and select an image file.
      Images inserted in this way will be sent together with the email.
    • Or enter the URL to an image on a Webserver.
      This graphic will then not be sent with the email.
      Instead, the image will be downloaded by the specified URL and displayed when the message is read in the recipient's email program.
Embedded images must be present at their storage location when the mailing is sent.

Insertion of Links
  1. Mark a text passage or an object (e.g. an image)
  2. Click in the Toolbar on the Create link icon
  3. Enter the URL in the subsequent dialog.
MS-Frontpage as HTML-Editor

To create more advanced HTML emails, you can use MS-Frontpage or other HTML-Editors. Save your work as a HTML-File and then open it in BulkMailer with "EMail->Load Webpage from File". BulkMailer fixes relative paths to images during this import.

MS-Word as HTML-Editor

Save your documents as Webpage (filtered).
Open this document in BulkMailer with "Email->Load Webpage from File"

MS-Publisher as HTML-Editor

See Create Html for Email with MS-Publisher

General Instructions for the sending of HTML Mail

Fonts used

What applies to Web pages also holds true for HTML Mails:
You should only use fonts which are also present on the recipients' computers. Typically, these are Arial, Times New Roman, Courier New, (Verdana, Tahoma, Comic Sans, Impact) etc. Fonts which are not present at the recipients' computers will possibly be replaced by other fonts in the display.

Sending images as links

It is very typical for newsletters that images are not sent with the mail but rather only as links to graphics located on a Webserver. This has the following advantages:

  • The Mail is kept considerably smaller, which means that it is sent more rapidly and also more rapidly opened by the recipients.
  • With linked graphics you can see the call-up rate of your mail be evaluating your Webserver's log file.

Inserting Fields


All available database fields are listed on the left-hand window border under "Database Fields". Drag on one of these fields in order to drop it into the mail text.

Later, when the mails are being compiled, these placeholders will be replaced by the database contents.

A special feature is the field [Salutation]: it inserts the personalized salutation (only with an Internal database).

This salutation is can be configured freely, see Salutations

Attachments


BulkMailer also sends Attachments. Click on the paper clip symbol to attach one or multiple files to the email.

The full path names are shown in the attachment text-box. Multiple paths are delimited by a semi-colon. You can manually edit the path names or add fields from the field-list to the paths, if you want to send personalized attachments.

These files must be present at the given location when the emails are sent. If an attached file can't be found, the email will not be sent.

Some file types, such as *.exe, *.vbs, etc. will not be accepted by the program. These file types could potentially contain viruses. If you wish to send such files, pack them with a pack program such as WinZip.

Sending of file-attachments is disabled with the DEMO PIN.

TIP: Check the files you attach for viruses before sending them.

Selecting Addresses

Quick Search (F6)

Switch over to the addresses table. Click there on the Search [F6] button. A dialog appears for the selection of addresses (see Screenshot).

After a particular selection is made, click on "OK". Only the selected records will now be displayed in the addresses table grid.

Click there on "All Records", in order to reset the selection.

The selection influences the function "Compile Mailing".

When compiling the mailing, select the option "All Visible Records" in order to compile a mailing on the basis of the selection made.

Selecting Addresses

Extended Search (F7)

Switch over to the addresses table. Click there on the Query... button.
The dialog for extended selection will appear (see Screenshot).

Once you made a particular selection, click on "OK". Now only the selected data sets will be displayed in the table view.

Click there on "All Records", in order to reset the selection

The selection influences the function "Compile Mailing". When compiling the mailing, select the option "All Visible Records" in order to compile a mailing on the basis of the selection.

Extended Query

Reset Search (F8)

Press F8 to reset the search and display all records

Compile Mailing


The emails are assembled on the basis of the current database selection and placed in the Outbox.

  1. Compose an e-mail
  2. Choose a group of records by search and/or selecting several rows with the Ctrl or Shift button pressed down.
  3. Select "Mailing->Compile Mailing" in the Main Menu
  4. In the following dialog, select whether the mailing is to be generated to
    • All Visible Records
    • only the marked Records (Current Selection).
    Compile Mailing
  5. Confirm with OK. The individual mails will now be compiled.
  6. A preview of the generated mails appears. Check the individual mails. The mails can still be edited or deleted at this stage.
  7. Place the mails in the Outbox by clicking on the corresponding button.

BCC-Mailing (Blind Carbon Copy)

In most cases, you should not use this option.

Without this option, BulkMailer sends every mail one by one. No recipient will se the other recipient's addresses.

The BCC Option was designed for the special task, when you need to send large file attachments to a large list of recipients.

With the BCC mode, BulkMailer devides every 50 addreses into a single BCC mail. This is the same, as if you address an email to yourself and drag 50 recipients into the BCC field, using a standard mail client.

But the BCC mode has two main disadvantages:

  • Personalization such as database fields, personal salutation etc. cannot be sent because the same email goes to many recipients.
  • You might run into traffic based Spam-Filters, when sending a larger amount of BCC mails.

To specify the block size, see "Options->BCC".

Preview of the Mailing

Mailing preview

After compilition of the mailing you can see the preview for every compiled email. Here you can check, if everything is OK with the mailing. If all database contents are inserted correctly and all personal salutations are as desired.

Click on "Move to Outbox", to put these emails into the Outbox, from where they can be sent later.

Sending Mails


To send existing mails from the Outbox, select "Mailing->Send Mailing (SMTP)".

After confirmation of the licensing aggreement and validation of the PIN the Send Dialog appears.

Connect with the Internet and select "Start!"

The sending of the mail should then begin.

The following remarks concern sending mail:

  • The sending can be interrupted and resumed at any time.
  • Only mails which have been sent successfully will be deleted from the Outbox.
  • Each email has it's own send log (history). This can ensure, that no recipient gets the same mail twice. (check option "no duplicate delivery...")
Send Mail Dialog


divider

Advanced Technics

Address Import


The import function of BulkMailer allows you to import addresses from other data sources into a BulkMailer address database

If you have opened an external data source, the import function is disabled, because external datasources are opened readonly. In this case, first open an existing BulkMailer address database or create a new BulkMailer address database.

select main menu "File->Import Addresses..."

Datenbank Import Dialog

Select the desired data source and click on "Open..."

You see further options for connecting with the data source.

For MS-Access, MS-Excel Tables, MS-SQL-Server, Text/CSV-files, MS Outlook Express (Windows Addressbook) and MS Outlook some special dialogs appear.

Select "BulkMailer Address Database" to append addresses to your currently opened BulkMailer address database from another BulkMailer address database.

Select "other Database" to import from a not listed ODBC source. BulkMailer then shows the Microsoft Datalink Dialog, where you can connect to all databases that come with an OLEDB provider or an ODBC driver.

For ODBC data sources, you may need to create a new System Datasource in the ODBC Manager (System Control Panel). Later you can select this DSN in the datalink dialog.

With most database formats, you can select a table or view in the next step.

After you have successfully connected with the imort data source, you can see a preview of your data in the bottom area of the Address Import window.

With the arrow buttons you can scroll through the data

Now assign the relevant fields from the import datasource to the target fields by selecting a target field from the drop-down list left beside. Only assigned fields will be imported. You must assign at least the field Email

Because the assignment of the fields takes some time, you may want to store the mapping for further use.

Click on "Import" to start the import.

The program asks you for some options:

  • Only Import valid email addresses: Addresses with invalid syntax or empty addresses will not be imported
  • Do not import duplicate email addresses: BulkMailer performs a doublets check
  • Detect gender automatically: BulkMailer uses a database to find the gender for a firstname
  • Extract Title Automatically: BulkMailer tries to extract a title (Dr., Prof., Ing., ...) from the field "Name"

Address Export


The addresses can be exported to a comma delimited text file (CSV). These kinds of text files can be read and imported from virtually all database programs.

A wide array of options exists for this format which can be selected when exporting from BulkMailer. The other program in which the file is to be further processed determines which options are to be selected.

  • Select "File -> Export addresses..." in the Main Menu
  • Select the target directory and enter a file name
  • The Export Options dialog appears.

You can select individual columns in the address table with the "Field list" icon. Select this in connection with the Export Option "Export only visible columns", in order to export only certain columns.

Export Addresses

Manage Groups


Addresses are assigned to specific groups in the address database. These groups allow the Selection of Records. Each group has it's Type of salutation

You can add new groups to the predefined groups.

Configure Groups

When you delete a group, all depending records from the address table will also be deleted.

Manage Salutations


Here is where you define how the automatic field "[Salutation]" is to be generated.

The salutation types Polite, Personal, Cool are each assigned to the respective groups; see Manage Groups.

Insert field contents by double clicking on the field list at the cursor position.

Configure Salutations

BulkMailer Profiles


BulkMailer supports in version 5 the work with different profiles. Select menu "File->Profiles", to open a profile, create new profiles and edit a profile.

You can create an unlimited number of profiles.

Profiles

Each profile has it's own data and settings:

  • Message texts (file Mailings.mdm)
  • Addresses database (file Addresses.bm3)
  • Exclusion list (file Exclude.mdb)
  • Outbox (file outbox.mdb and folder \Outbox\)
  • Settings (under Extras->Options)

This data is stored under \My Documents\BulkMailer\, each profile in it's own directory named with Profile-00000x (a running nummer).

An address database and exclusion list can be shared by different profiles

After creating a new profile, the program creates a new and empty address database and exclusion list.

Later you can open a different BulkMailer address database with menu "File->Open BulkMailer Address Database". Same with the Exclusion List with menu "Exclude->Open Exclusion List." The last opened address database and exclusion list will be loaded at startup of this profile later again.

This way several profiles can share the same address database and exclusion list

TIP: Move the shared files to a separate folder. Than you have a better overview about what files are used globally

When deleting a profile, all corresponding data will also be deleted. Please mind, that these data files are not also used by other profiles.

You must close a profile (by opening another profile) before you can delete it.

Scripting


BulkMailer can execute VBScript Code within the mail text while the e-mails are being compiled. This means that you can control the contents of each individual email with your own programming.

You access the objects of the e-mail thereby by means of two BulkMailer script objects. As a result of this, you can

  • output text
  • attach file attachments to the e-mail
  • modify the subject line
  • load texts/templates from a file
  • access the current data record

This means that you will be able to manage the following tasks, for example:

  • all recipients of the domain xyz.de receive a different text content
  • all of those interested in the product xyz receive product information as an attachment
  • [..]

Prerequisites

You will need at least some programming skills of VBScript.

Script Block Masking

A Script Block is masked by the following character string:


<% Script-Code %>
An e-mail can contain several Script Blocks. Any VBScript-Code can be specified within this marking.

  • In a PlainText mail, the script block is inserted directly into the email message
  • In a HTML mail, the script block must be inserted into the HTML source code
Examples:
Numbers from 1 to 100

<%
For i = 1 To 100
   Email.Textout i & vbCrLf
Next
%>
Current Date

<% Email.TextOut FormatDateTime(Now, 1) %>

The Email-Object

The e-mail object is available to you within the Script Code with the following methods and properties:

Output of the character-string

read/write the subject

Attach a file

Insert the contents of a text file at this position

Stop generating this e-mail, do not copy it to the outbox

The Record-Object

Return value: contents of the current value from this column as a character-string.

Return value: contents of the current value from this column as a variant-type.
(can contain NULL values, numbers, dates, etc.)

The BulkMailer address database internally uses different column names, than shown in the application.
A full listing of the column names can be found here.

Examples


<%
If InStr(1, Record("Email"), "@xyz", vbTextCompare) <> 0 Then
	Email.LoadTextfile "d:\mails\abc.txt"
Else %>
	Standard Mailtext
<% End If %>

<%
If Record("InteresseXYZ") = True Then
	Email.AttachFile "d:\produktinformation\produktxyz.pdf"
End If
%>;

*(your database contains a column "InterestXYZ" of the boolean type)


<%
' --- calculate birthday
If IsDate(Record.Value("Birthday")) Then
	Const CDays = 7 ' --- can be adjusted
	Dim dtBirthDay
	Dim lDiff

	dtBirthDay = DateSerial(Year(Now), Month(Record.Value("Birthday")), Day(Record.Value("Birthday")))

	' --- handle overflow
	If 365 - DateDiff("d", Now, dtBirthDay) <= CDays Then
		dtBirthDay = DateAdd("yyyy", -1, dtBirthDay)
	End If
	lDiff = DateDiff("d", Now, dtBirthDay)

	If lDiff <= 0 And lDiff >= -CDays Then  ' had birthday within the past 7 days
		' --- add a text block from file
		Email.LoadTextfile "d:\Birthday.txt"
	End If
End If
%>;

VBScript Language Reference Guide

A language reference guide to VBScript can be found in the
MSDN Library

Notes concerning protection of registered trademarks

The VBScript technology is the property of the Microsoft Company. Integration into this application has been possible thanks to the outstanding interfaces available with this technology.

Column Names in the BulkMailer Address Database

 
German Englisch BulkMailer Address Database
ID ID ID
Titel Title Title
Vorname Firstname FirstName
2. Vorname Second Name SecondName
Nachname Lastname LastName
Spitzname Nickname NickName
Anzeige-Name Display-Name DisplayName
Email Email EMail
Gruppe Group Gruppe
Privat:Land Private:Country Private_Country
Privat:Staat Private:State Private_State
Privat:PLZ Private:ZIP Private_PostalCode
Privat:Ort Private:City Private_City
Privat:Strasse Private:Street Private_Street
Privat:Telefon Private:Phone Private_Phone
Privat:Fax Private:Fax Private_Fax
Privat:Mobil Private:Mobile Private_Mobile
Privat:Homepage Private:Homepage Private_Homepage
Firma Company Business_Company
Firma:Titel Biz.:Title Business_Title
Firma:Abteilung Biz.:Department Business_Department
Firma:Bro Biz.:Office Business_Office
Firma:Land Biz.:Country Business_Country
Firma:Staat Biz.:State Business_State
Firma:PLZ Biz.:ZIP Business_PostalCode
Firma:Ort Biz.:City Business_City
Firma:Strasse Biz.:Street Business_Street
Firma:Telefon Biz.:Phone Business_Phone
Firma:Fax Biz.:Fax Business_Fax
Firma:Pager Biz.:Pager Business_Pager
Firma:IP-Phone Biz.:IP-Phone Business_IP_Phone
Firma:Homepage Biz.:Homepage Business_Homepage
Kommentar Comment Comment
Geschlecht Gender Gender
Geburtstag Birthday Birthday
Hochzeitstag Anniversary Wedding_Day
Standard Adresse Standard Address Default_Address_Index
Präferenz Preference Send_Internet_Encoding
Benutzerdefiniert 1 User Defined 1 User1
Benutzerdefiniert 2 User Defined 2 User2
Benutzerdefiniert 3 User Defined 3 User3
Benutzerdefiniert 4 User Defined 4 User4
Benutzerdefiniert 5 User Defined 5 User5
Erstellungsdatum Date Created Record_Created
Letzte Änderung Date Changed Record_Changed

BulkMailer EULA

License Agreement

§ 1 Object

The object of these Licensing Conditions is the computer program BulkMailer Professional, its online user documentation and other written materials associated with it, which are together referred to below as the software.

§ 2 Guarantees

(1) This software is provided to the licensee "as is".

(2) Kroll Software-Development makes no guarantees whatsoever in terms of functional capability, freedom from error or applicability for any particular purpose.

§ 3 Evaluation

(1) The licensee may test the program free of charge and without obligation for a 30-day period in order to determine whether it supports him in his work.

(2) After this 30-day trial period the licensee must obtain a utilization license if he wishes to continue to use the program.

§ 4 Utilization License

(1) This Utilization License grants the right to use the software at one workstation. Simultaneous utilization at more than one hardware requires a multiple license.

(2) The Utilization License is tied to particular sender e-mail addresses. This e-mail addresses can be retroactively changed at no extra charge. This kind of switchover takes up to a maximum of one week. Additional e-mail sender addresses can be ordered separately for an additional fee.

§ 5 Delivery

(1) This software is offered exclusively online for downloading. No data carriers or printed manuals will be provided to the customer, even in the event of licensing.
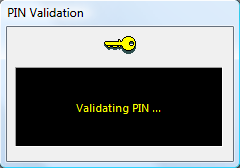
§ 6 PIN Validation

(1) The program tests the validity of a Personal Identification Number (PIN) prior to the sending of each mailing. This PIN is tied to a particular sender address. This mechanism is intended to prevent misuse of the program.

(2) Kroll Software-Development ensures that no data other than the licensee’s e-mail address, PIN and version number is transmitted during the course of the PIN testing. The licensee’s e-mail address will not be made known to third parties.

(3) Because the testing of the PIN takes place online, a hundred percent availability cannot be guaranteed.

§ 7 Misuse

(1) The non-requested sending of advertising e-mails and so-called SPAM mails is forbidden in many countries. BulkMailer was not developed to be used for this purpose.

(2) The utilization of the software for spamming will be deemed misuse and will lead to loss of the utilization authorization.

(3) Kroll Software-Development reserves the right to exclude any users who misuse this software for spamming from its further utilization, particularly in cases where Kroll Software-Development is sued or warned by third parties. Such users shall be entitled to no further claims against Kroll Software-Development, including but not limited to such things as a refund of the licensing fee.

§ 8 Decompiling and Program Modifications

(1) No reverse translation of the program code made over to the licensee into other code forms (decompiling) or any other types of reverse engineering of the different production stages of the software, to include any program modification, is permitted.

(2) The removal of any protection device against copying or of any similar protective routines is not permitted.

(3) Originator notices, serial numbers and any other characteristics which serve program identification shall not be removed or altered under any circumstances.

§ 9 Liability

(1) In the event of damages or indirect damages arising from the utilization of this software, the liability of Kroll Software-Development is limited to a maximum of one time the purchase price.

(2) Liability for data loss is limited to the typical recovery expense arising from restoration from backups made at regularly scheduled intervals in accordance with the risk involved.

§ 10 Agreements in written form only

(1) No modifications or extensions of these contractual conditions, in particular any agreements which extend beyond the usual contract execution processes, nor any other special guarantees and agreements shall be made by the employees of the supplier. Such modifications, extensions or agreements are only binding in conjunction with specific written confirmations from the supplier.

§ 11 Area of Jurisdiction

(1) Area of Jurisdiction is in any case Altdorf, Switzerland.

 
Kroll Software-Development, Altdorf, November 14, 2019

Feedback Module


With the Feedback Module you can automize the handling of returned emails. It supports Bounce-Management and manages subscriptions.

BackUp your BulkMailer data or transfer it to a new computer

You often realize how important a good data backup is, when it's too late. Hard-drives can give up in a same way as light bulbs do, computers can be stolen or their tender electronics can be destroyed during a thunder storm.

Backup the BulkMailer data

BulkMailer stores all data in a separate data directory.

In Version 5, this is
\My Documents\BulkMailer\

Starting with version 6, select menu Extras->Set data directory to identify this directory. In the first input field is the full path. Close this window with “Cancel”.

By default, this is
\AppData\Roaming\Kroll-Software\BulkMailer\
Or are you searching with the Windows search function after BulkMailer.cfg file

Backup this complete directory with all files and sub-folders (eg on a USB stick, which is currently the safest and most durable medium).

Data transfer to another computer

Install BulkMailer, run it once and check the new data directory with menu Extras->Set data dir (see above). Then close the program and copy the backed up files to this location. You can overwrite the empty databases, that BulkMailer already had created.

If BulkMailer can't find a database, he simply creates a new one on next start-up. You can simply overwrite such empty databases with your backed-up data.

The path to the data directory depends on the logged on Windows user, so it may need some more adjustments, when the user name has changed:

IMPORTANT

If the windows user has a different name (log-on), open the file “BulkMailer.cfg” in the data directory using a plain text editor* and correct all file paths in it to the new valid paths.

*) use Notepad or Windows Editor, don't use Wordpad or MS-Word

Transfer individual files

Alternatively, you can restore the individual databases that are essential in each BulkMailer profile folder:

  • *.bm3: The BulkMailer address databases
  • Exclude.mdb: The exclusion list

(Both can be opened via the corresponding menu items also from within the program.)

  • Mailings.mdm: The message texts

BulkMailer Address Databases

Scan your hard disk for *.bm3 files
Open the BulkMailer address databases by menu File->Open BulkMailer address database..

Exclusion List

Scan your hard disk for “Exclude.mdb” files
Open the exclusion list by menu Exclusion->Other exclusion database..

Accessing the data without BulkMailer

All databases used are MS Access database files that you can edit with MS-Access.

Good to know: Your data will never get lost. Even without the BulkMailer application, you can still access all data using MS-Access or other applications, that can read MS-Access databases.

When you want to open a *.bm3 file with MS-Access, type *.bm3 into the file mask in the file-open dialog. Then you should see the bm3-files listed and you can open them. Same with Mailings.mdm

BulkMailer: Logging at Protocol Level

When you want to analyze connection problems or track the delivery of single mails by comparing send logs with mail server logs, it can sometimes be useful to have a complete SMTP dialogue dump in a log-file.

For this reason BulkMailer has a trace-log function implemented.

You may also find this useful, when you are technically interested in what BulkMailer finally sends and how the different encodings in a typical mime message (multipart, header encodings, quoted-printable, line length and line-breaks in UTF-8 encoded emails, challenge-response with authentication, etc.) are performed.

BulkMailer has it's very own SMTP and MIME implementation developed by Kroll-Software and not influenced by any other library. It was built up from the ground by strictly following the relevant RFCs. This might be one reason for BulkMailer's success: It complies better with RFC standards than most other mailers do.

1. Activate the trace log

In the send dialog window, just before you click on "Start" to start sending, press the keys <Ctrl-t>. A message box should open and ask for confirmation.

2. Send some mails

Click on the [ Start ] button to send some emails.

3. Analyze the trace log

You can find the file 'trace.log' in the BulkMailer data directory.

To know what your current data directory is, open menu "Extras->Set data directory". You can see the full path in the first input-box. Close this dialog without doing any changes by "Cancel".

Open the trace-log file with any text editor.

Share this trace-log with the administrator of the mail-server, so that he can help to analyze problems. But don't give it to others, because it could contain secret passwords.

Limitations

Log files can become quite big and can exceed the 2,4 gig file size limit with ease.

This trace-log function always appends to the file. Errors are not handled. It was designed to analyze certain problems and is not meant to be used for general every-day logging. If you want to start a new log, simply delete the trace.log file before doing the next trace.

BulkMailer Network Installation

BulkMailer supports the usage by multiple users in a windows network.

The program manages concurrent access to the BulkMailer address databases and exclusion lists. This data can be edited by multiple clients at the same time.

Each client will still have it’s own messages and out-box. Collaboration on the message texts and simultaneous sending from the same out-box is not implemented. This data should be managed locally.

Installation

  1. Install BulkMailer on each client computer.
  2. Copy the common BulkMailer Address Databases (*.bm3) and Exclusion Lists (Exclude.mdb) to a Windows Server or another central Windows computer in your local area network.
  3. On each client computer, open the BulkMailer Address Database with menu
    File->Open BulkMailer Address Database..

  4. For the Exclusion Lists use menu
    Exclusion->Open another Exclusion Database..

To use the software by multiple users from different computers requires a multiple-user license.